At Fast Track IELTS, we know how confusing and stressful it can be for our students to book their OET (Occupational English Test). So we want to give you this definitive guide on how to book the OET exam to ensure a smooth and hassle-free registration.
We will explain how to book an exam for both paper-based and computer-based exams, the documents you will need, the payment process and also how to avoid some common pitfalls that students face when booking their exam.
Let’s get started!
Chapter 1: Selecting a Test Venue
The first step to booking any OET exam is to select a test venue. Go to: oet.com/test/book-a-test and type in your preferred location into the search bar.
Select “Find a test” and you will be taken to a list of possible venues nearest to your location.
Next, decide which type of test you want to take. Beside each venue, you will see a test type: OET on Paper or OET on Computer.

This tells you which type of test you can take at each venue. Each test type has a slightly different booking method so make sure to select the correct option.
Each test type has a slightly different booking method so make sure to select the correct option.
Chapter 2: OET on Paper – Creating an Account
Once you have chosen a venue for OET on Paper, select “Book Now” and you will be taken to the registration page.
There are 4 pages to complete in order to create an account.
Page 1
Complete the personal information and upload an image of yourself. If you are having problems uploading the image, inputting your contact number or ID information, go to Chapter 5 – Troubleshooting.
Page 2
Read and accept the conditions.
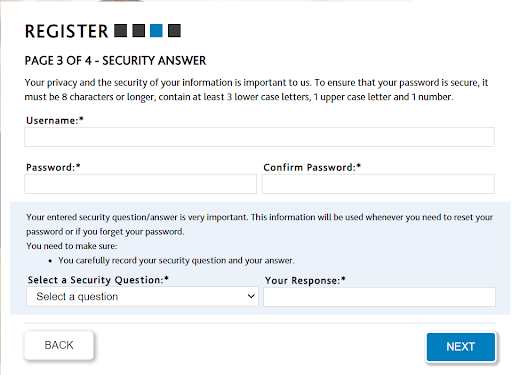
Page 3
Create a username, password and a security question. Remember to take note of your username and password before moving on to the next step.
Note: Passwords will be case sensitive so be careful as you create the login details.

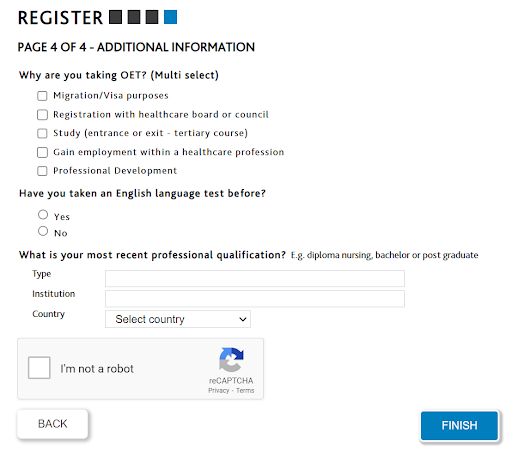
Page 4
Finally, select the relevant options in the additional information section and select “Finish”.

Registration Completion
Once complete, you will receive an email from OET to confirm that you have successfully created an account.
Click on the link provided in the email to verify your account. Remember to always check your junk/spam folders in case the confirmation email was sent there.
Logging into Candidate Portal
Now open the candidate portal and enter in the username and password that you created on Page 3 of your application. Select “Go” and you will be taken to your candidate portal:
This is where you will apply for your exam and view your OET results. Most importantly, this is where you will also allow your registering body to access your results once you have passed the OET exam.
Most importantly, this is where you will also allow your registering body to access your results once you have passed the OET exam.
Chapter 3: OET on Paper – Booking Exam
Now that you have an account, select “Apply for the Test” at the top of the screen on your candidate dashboard.
There will be 4 steps for you to complete.
Step 1 – Profession
- Select your profession
- Select all 4 tests types (you must sit all sections of the exam each time you take the exam)
- Select the country where you will sit the exam.
Step 2 – Date
Select the date when you would like to sit the exam.
If you do not see your preferred date, this could be because this date is not available to your profession or the booking deadline has passed for that date.
Step 3 – Venue
Select the venue where you want to sit your exam.
If you cannot find your preferred venue in the list of options, it may be already fully booked for the date you selected. If so, you can go back to Step 2 and try to select a later date then check if your venue is available.
If you require special medical arrangements for the exam, you should select this option:
Step 4 – Payment
Now it’s time to pay for the exam. You will see an overview of the exam dates and start times as well as the total amount due. For a comprehensive guide on the full costs of the OET, take a look at our article on this.

Complete the payment information and if you are successful, you will receive a confirmation email.
Be careful! If you do not receive an email, this means that your OET exam booking has not been completed and the exam has not been booked. If you do not receive an email, contact OET service team for help.
Chapter 4: OET on Computer – Creating Account and Booking Exam
If you have chosen to sit OET on Computer, select “Book Now” beside the test venue. This takes you to the OET Global homepage where you will create an OET account and book an exam at the same time.
Select “Book OET Now” to begin your registration process. There are 6 steps to complete.
Step 1
Enter your email address, preferred name and the country where you will sit the exam. Accept the terms and conditions then select “Next”.
Step 2
Complete the personal information then select “Next”.
Note: You must use the exact same name as the ID which you will use on test day.
Step 3
Select your profession from the list of options. Select the option for “In person at a venue”. This is confirmation that you will attend a test venue for your computer-based exam.
Once you select your profession, you will be given search results showing available test slots which include various dates and times.
This test date will only be for the Listening, Reading and Writing sub-tests. You will sit the Speaking sub-test at home via Zoom instead of a test venue.
Next, you must select a suitable date and time for your Speaking sub-test.
Note: The Speaking exam can be booked for the same day as the other sub-tests but if you have to travel a distance to your test venue, it is recommended that you choose a different date to allow you time to set up at home for the Speaking exam.
This test date will only be for the Listening, Reading and Writing sub-tests. You will sit the Speaking sub-test at home via Zoom instead of a test venue.
Make sure to read the information regarding the Speaking sub-test and select “Confirm”. For more detailed information on this, read the User Guide on the Speaking sub-test on Zoom which explains what to expect on test day.
Step 4
Review your booking details then select “Reserve My Test Slot”.
Step 5
Provide your ID details then upload an image of your ID. For example, if using a passport, upload an image of the page which includes your photo and birth details.
Note: Make sure that it is no larger than 500KB. If you are struggling to upload the image, go to Chapter 5 – Troubleshooting.
Step 6
Now it’s time to pay. Select “Proceed to Payment” then process the payment.
Complete the payment information and if you are successful, you will receive a confirmation email.
Be careful! If you do not receive an email, this means that your OET exam booking has not been completed and the exam has not been booked. If you do not receive an email, contact OET service team for help
Chapter 5: Troubleshooting Common Problems
Problems Uploading Images
Size restrictions on images are a common reason why you are unable to upload images successfully. The restrictions are:
OET on Paper: Between 200KB and 2MB
OET on Computer: Less than 500KB
The easiest way to take an image is to use your phone. You can check the size of your image by looking at the image details on your phone. If your image is too big or too small, your may be able to resize the image on your phone.
There are also websites available which allow you to increase the size of your image for free by just uploading the photo and setting the size of the image you would like. For example, if you type “increase size of image” into an internet search engine, you will see several options of websites that offer this service.
Once you have the correct-sized image, you should be able to upload this with no issues.
Phone Number
The format of the phone number can cause confusion so we will explain exactly what you need to do.
Every country has a country code and for the UK, the country code is 0044.
The area code is the first four digits of a number after the first 0. So if the mobile number is 07890 123 456, the area code is 7890.
Finally, input the remaining numbers into the phone number section.
Do You Need Help?
We want to take the stress out of booking the OET exam so leave us a comment below and you can chat to a member of our team. If you need more assistance, consider enrolling in our OET preparation course at Fast Track IELTS where we provide guidance on how to book the OET exam and also how to register with your registration body.


